")
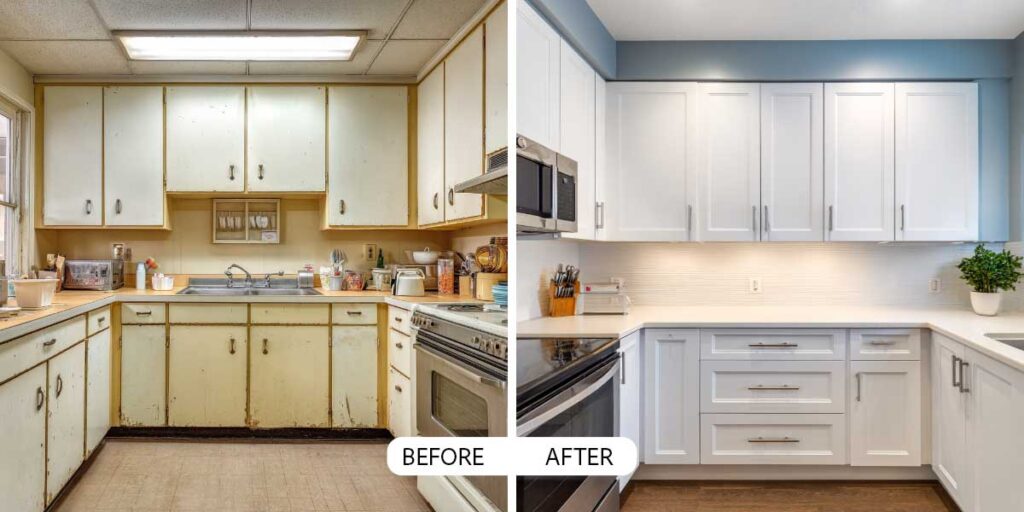
Old laminate kitchen cabinets can make your kitchen feel stuck in the past. Mine looked exactly like a 90s rental before I decided to tackle them myself. I did not have the budget for new cabinetry, so I went searching for budget-friendly laminate cabinet paint projects and found out it is completely possible without spending thousands.
By the end of this guide, you will know how to paint laminate cabinets without sanding, avoid paint peeling, and get a smooth, professional-looking finish that lasts.
Table of Contents
1. Most Common Questions & Pain Points
Here’s what people usually ask before starting:
- Can laminate cabinets even be painted successfully?
- Do I need to sand, or can I skip it?
- What kind of paint sticks to laminate?
- Which is the best cheap primer for laminate cabinets?
- How do I avoid brush marks and streaks?
- Will the paint chip or peel quickly?
- How long does it take from start to finish?
- Can I do this if I’m painting in a small kitchen?
- How much will this cost in supplies?
- What’s the best way to keep the finish looking good long-term?
2. Step-by-Step Guide (Beginner Skill Level)

Step 1: Empty and Prep Your Cabinets
Remove everything inside. Take off the doors and hardware, labeling each piece so reassembly is smooth.
Setup & Safety: Work in a well-ventilated area. Lay down drop cloths to protect floors. Keep kids and pets out of the workspace.
Tips:
- Use painter’s tape to number each cabinet door.
- Keep screws in labeled bags.
- Take photos before removing anything, it helps later.
Step 2: Degrease and Prep Laminate Cabinets Without Sanding
This is where many beginners skip steps and regret it later. Clean every surface with a good degreaser like Krud Kutter to remove cooking oils. Instead of sanding, use a liquid deglosser to dull the slick surface so paint can stick.
Test Patch Tip: Before committing to the whole kitchen, paint a small hidden area like the inside of a cabinet door. If it adheres well after 24 hours, you are ready to proceed.
Tips:
- Work in sections so the deglosser does not dry before wiping.
- Wear gloves for safety.
- If you have stubborn stains, scrub lightly with a non-abrasive pad.
Step 3: Repair Any Damage
Fill chips and scratches with a paintable laminate repair filler. Sand lightly once dry for a smooth surface.
Tips:
- Overfilling means more sanding, so go light.
- A sanding sponge gives better control than sandpaper.
- Check edges for peeling laminate and glue them down before painting.
Step 4: Choose the Best Budget-Friendly Primer for Laminate Cabinets
A cheap primer for laminate cabinets is fine as long as it bonds well. Zinsser BIN or INSL-X Stix are great budget-friendly options. Apply a thin coat with a foam roller for the smoothest finish.
Alternative Method Note: Some painters prefer lightly sanding and using chalk paint or a shellac-based primer. These can work, but this guide focuses on a no-sanding approach to save time and reduce mess.
Tips:
- Do not skip primer, it is the key to avoiding paint peeling on laminate cabinets.
- Let it dry fully before painting.
- Use an angled brush for corners.
Step 5: Paint in Thin, Even Coats
Use a durable acrylic latex or cabinet-specific enamel. Two or three light coats work better than one heavy coat.
Tips:
- For a flawless finish, try the foam roller trick for cabinet doors, using light, steady strokes without pressing down.
- Lightly sand between coats for extra smoothness.
- If you are painting laminate cabinets in a small kitchen, work in batches to avoid blocking your space.
Step 6: Let the Paint Cure Properly
Even if it feels dry to the touch, curing can take days. Avoid reinstalling doors too soon to prevent sticking.
Tips:
- Leave doors off for a few days.
- Keep surfaces clear during the curing period.
- Aim for mild weather for faster curing.
Step 7: Reassemble and Upgrade Hardware
Reattach doors and hinges. If you can, replace dated knobs and pulls for a fresh look.
Tips:
- Use felt pads to prevent paint chips.
- Align doors carefully to avoid scuffing edges.
- Upgraded hardware makes the project look even more high-end.
3. Time & Cost Estimates
| Step | Time Estimate | Budget Notes |
|---|---|---|
| Prep & cleaning | 1-2 hours | Degreaser + tape: under $15 |
| Priming & painting | 3-5 hours total | Bonding primer + paint: $40-$80 |
| Cure & reassemble | 2-3 days | No added cost but patience required |
4. Troubleshooting & Common Mistakes
- Peeling Paint: Usually from skipping primer or not deglossing.
- Brush Marks: Use a foam roller instead.
- Chips Within Weeks: Likely not enough cure time before use.
- Uneven Color: Keep layering thin coats until fully covered.
5. FAQs
Q: Can I paint laminate without sanding?
A: Yes, just use a deglosser and bonding primer.
Q: How much will it cost?
A: Around $60 to $150 depending on supplies.
Q: How long will it last?
A: With proper prep, 5 to 10 years.
Q: How long does laminate paint take to dry?
A: Most cabinet paints are dry to the touch within 6 to 8 hours, but allow 2 to 3 days before reassembly and up to 30 days for full curing.
6. Next Steps & Advanced Techniques
- Try spray painting for a flawless finish.
- Experiment with two-tone cabinets.
- Add soft-close hinges during reassembly.
7. Glossary
- Deglosser: A liquid that dulls glossy finishes so paint adheres.
- Bonding Primer: A primer designed to stick to slick surfaces like laminate.
- Cure Time: The time it takes for paint to fully harden.
Conclusion
Painting laminate cabinets on a budget is one of the most cost-effective ways to transform your kitchen. Whether you are skipping sanding, choosing a budget-friendly primer, or working in a small space, the key is prep, patience, and thin, even coats. Follow these steps and you will not only save money, you will also create a kitchen you enjoy cooking in.
More on Blufashion
- Learn smart ways to invest in real estate even during a recession.
- See our honest review of the Bensons for Beds Tempur mattress
- Get inspired with our best spring home improvement ideas
- About the Author
- Latest Posts

I’m Iskra Banović, editor of Blufashion and the voice behind its fashion, beauty, and lifestyle stories. Fashion, beauty, and lifestyle are my playground, but I’m just as likely to share the messy side of it all, like the time I tested a “must-have” skincare gadget and ended up with glitter stuck in my hair. I love turning trends and everyday finds into something useful (and fun) for real people.


2 Comments
I just finished repainting my old laminate cabinets using the tips in this article and I am super impressed with how they turned out. The budget-friendly paint plus a little sanding really changed the whole kitchen vibe. Here’s my question though: my paint is already starting to chip slightly around the handles. Has anyone had that happen? What did you use to prevent chipping without having to repaint the whole thing again?
I love hearing that your cabinets look refreshed, and you’re right, the right prep and paint can make a big difference. Chipping around handles is pretty common if the area wasn’t sealed well or if it’s a high-touch spot.
One trick I’ve found is lightly sanding those spots again and adding a thin coat of clear polyurethane or a satin polycrylic topcoat once the paint is fully dry. It gives a bit of extra protection without changing the finish. You could also use a cabinet liner under the hardware to protect the paint.
Let me know what type of paint you used and I can recommend the best topcoat for it.