
I love peel and stick for fast kitchen glow-ups, but the biggest mistakes are always the same: poor prep, textured walls, deep grout lines, heat or steam nearby, light pressure during install, and no cure time. The fix is simple, clean and prime smooth surfaces, roll with pressure, respect heat and moisture rules, and let the adhesive build strength for up to 72 hours. Yes, you can install over existing tile if it is smooth and degreased, and you fill or bridge grout lines. If your tiles keep coming off, it is almost always surface prep, low pressure, or installing in the wrong spot.
12 common peel and stick backsplash mistakes, and the fix
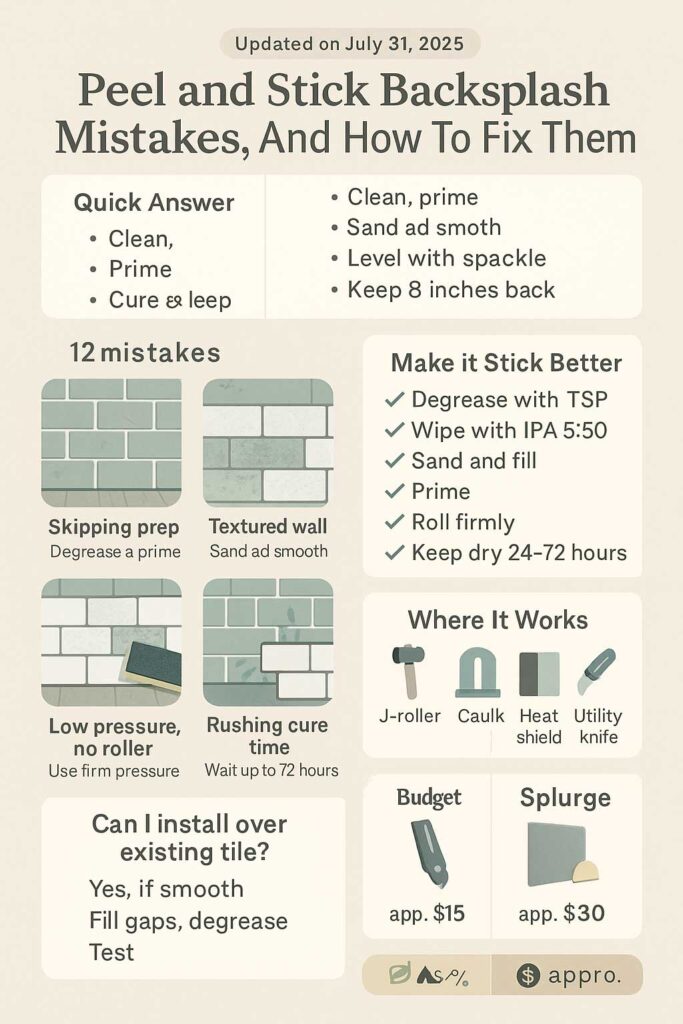
1) Skipping real surface prep
Why it works: Adhesives need a clean, smooth, dry surface to grab. Even a little grease or dust weakens the bond.
How to try it:
- Wash with a degreaser, then wipe with 50:50 isopropyl alcohol and water.
- Fill small divots, sand smooth, and vacuum dust.
- Prime if the wall is porous or slick.
- Pro tip: Give primer a full dry window before tiling.
- Common mistake: Using dish soap that leaves residue. Smart Tiles says use TSP instead.
2) Installing over textured or dusty paint
Why it works: Texture and dust reduce adhesive contact, so corners lift.
How to try it: Lightly sand orange peel to knock down high spots, wipe with IPA, then prime.
Pro tip: Do a one-tile test overnight before committing.
3) Ignoring fresh-paint cure times
Why it works: Fresh paint outgasses, so tiles can slip.
How to try it: Wait 21 days after painting before installation.
Pro tip: If you must install sooner, prime a removable backer panel instead.
4) Not degreasing kitchen walls
Why it works: Aerosol cooking oils travel. Adhesive will not grab through it.
How to try it: Degrease with TSP, then wipe with IPA solution and let dry fully.
Pro tip: Degrease twice behind the range.
5) Sticking over deep grout lines without leveling
Why it works: Grout valleys telegraph through thin tiles and create weak spots.
How to try it: Skim shallow grout lines with lightweight spackle, sand smooth, or choose thicker tiles with built-in relief. Test first.
Pro tip: If lines are deep, apply a thin backer panel first for a perfectly flat surface.
6) Not using enough pressure or a roller
Why it works: Adhesion improves with firm pressure. A J-roller helps the adhesive wet out.
How to try it:
- Set the tile.
- Roll every square inch with 15 psi pressure.
- Re-roll edges.
Pro tip: Warm tiles to room temp before install to improve tack.
7) Rushing the cure time
Why it works: Adhesive strength builds over 24 to 72 hours. Early steam or splashes can cause lifting.
How to try it: Keep the area dry and avoid heavy cleaning for three days.
Pro tip: If you can, lightly warm the wall after install to accelerate cure.
8) Getting too close to heat and steam
Why it works: Excess heat and open flames can degrade the adhesive.
How to try it: Keep an 8 inch safety zone behind a gas cooktop without a back panel, and avoid surfaces over 120°F. Consider a metal or glass heat shield.
Pro tip: Leave 2 inches around countertop appliances like toaster ovens.
Common mistake: Running tile right to the burner edge.
9) Using the wrong product in wet zones
Why it works: Most peel and stick tiles are water resistant, not waterproof, so showers and constant spray can cause failure.
How to try it: Use peel and stick as a splash-zone backsplash, not inside the shower.
Pro tip: Caulk the bottom edge where counter meets tile to block water wicking.
Common mistake: Expecting peel and stick to behave like thinset tile in a shower.
10) Bad layout and pattern drift
Why it works: Small misalignments compound across the wall.
How to try it: Strike a level reference line and dry-fit the first row. Stagger seams and step back every few sheets to check the pattern.
Pro tip: I mark a faint pencil grid so subway patterns stay true.
11) Skipping edge finishing and caulk
Why it works: Raw edges catch and peel.
How to try it: Finish with peel-and-stick edge trims, metal L-profiles, or a tiny bead of paintable caulk at the perimeter.
Pro tip: Color-match caulk to the “grout” for a seamless look.
12) Cutting around outlets the unsafe way
Why it works: Oversize cutouts look sloppy and leave gaps that collect grease.
How to try it: Kill power, remove cover plates, trace, then score slowly with a sharp blade. Use spacers so cover plates sit flush.
Pro tip: I use a paper template first so I only cut once.
Where peel and stick works best vs where to avoid
| Works great | Avoid or rethink |
|---|---|
| Kitchen backsplashes away from open flame | Direct shower walls or constantly wet areas |
| Laundry rooms, accent walls | Rough, textured, or porous surfaces |
| Smooth painted drywall and existing smooth tile | Surfaces over 120°F, or right behind open gas flames |
Quick checklist, how to make peel and stick stick better
- Degrease with TSP, then wipe with IPA and water.
- Sand light texture, fill divots and shallow grout lines.
- Prime porous or problem areas, then wait the full dry or cure window.
- Install at room temperature, roll firmly with a J-roller.
- Keep dry and low-steam for 24 to 72 hours while the bond builds.
- Respect heat clearances and avoid open flame zones.
Budget and splurge add-ons that actually help
- Budget: TSP substitute or degreaser, approx 10 USD.
- Budget: Foam sanding block and lightweight spackle, approx 12 USD total.
- Budget: J-roller, approx 15 USD.
- Budget: Paintable kitchen and bath caulk, approx 6 USD.
- Splurge: High-bond adhesion promoter or primer, approx 20 to 30 USD.
- Splurge: Aluminum heat shield panel for behind cooktop edges, approx 25 to 40 USD.
- Splurge: Metal L-profile edge trim, approx 12 to 20 USD.
All prices are approximate and in USD.
Action plan, do this today
- Wipe your backsplash area with degreaser, then IPA and water.
- Circle any texture or grout lines to fill and sand smooth.
- Mark one level reference line.
- Install the first two sheets, roll firmly, and wait 24 hours before the rest if you are nervous.
- Keep it dry and low-steam for 72 hours, then caulk edges.
4) FAQ
What are the disadvantages of peel and stick backsplash?
Lower heat tolerance, no constant-water exposure, and it depends heavily on prep and a smooth surface.
Can I put a peel and stick backsplash over existing tile?
Yes, if the old tile is smooth and degreased, and grout lines are shallow or leveled first. Test a sheet before doing the whole wall.
How can I make my peel and stick backsplash stick better?
Degrease, wipe with IPA, warm to room temp, roll with firm pressure, and let it cure 24 to 72 hours before heavy cleaning or steam.
Why does my peel and stick backsplash keep coming off?
Usually texture, grease, low pressure during install, or installing too close to heat or steam. Fix the surface, then re-roll and respect cure time.
Is it safe behind a gas stove?
Keep an 8 inch no-tile zone if there is no back panel, and avoid surfaces over 120°F. Use a heat shield if needed.
How long will a peel and stick backsplash last?
Several years in low-moisture, low-heat areas with good prep, but it is not as durable as traditional tile.
5) Who, How, Why
Who wrote this: Home projects editor and DIY tester at Blufashion
How we created it: I installed multiple peel and stick backsplashes in rentals and my own kitchen, documented what failed, then cross-checked brand installation guidance and adhesive best practices. Our editor tightened the steps and added safety notes.
Why we wrote it: You want the glow-up without the peel-off. This guide shows exactly what to avoid and the small upgrades that make peel and stick actually stick.
6) Sources list with links and dates
- Smart Tiles, official FAQ on surfaces, prep, heat and wet-zone guidance, accessed July 31, 2025. Smart Tiles INT
- Tic Tac Tiles, official FAQ on surfaces, TSP cleaning, temperature limits, and heat clearances, accessed July 31, 2025. Tic Tac Tiles
- 3M, surface prep and pressure guidance for pressure-sensitive adhesives, including bond build over 24 to 72 hours, accessed July 31, 2025. 3M
- The Spruce, expert overview on where peel and stick tiles work, limitations in high moisture, and durability tradeoffs, published February 8, 2025, accessed July 31, 2025. The Spruce
More on Blufashion
- Renter friendly kitchen upgrades, smart ideas that do not damage walls.
- Small apartment decorating ideas you can finish in a weekend.
- Plug in wall sconce ideas for renters, perfect for kitchens without hardwiring.
- Command hook curtain rod hack for a no-drill window glow-up.
- About the Author
- Latest Posts

I’m Iskra Banović, editor of Blufashion and the voice behind its fashion, beauty, and lifestyle stories. Fashion, beauty, and lifestyle are my playground, but I’m just as likely to share the messy side of it all, like the time I tested a “must-have” skincare gadget and ended up with glitter stuck in my hair. I love turning trends and everyday finds into something useful (and fun) for real people.


