
I wear press-on toenails for sandals all summer, and yes, they can survive the pool. The secret is boring prep, the right adhesive, and a little patience while the glue cures. Tabs are perfect for a weekend, glue is what I pick when I want a week of wear. In this guide, I’ll show exactly how I apply them so they hold up to straps, sidewalks, and splash zones.
My timing that rarely fails:
- Day before: Trim and shape, push back cuticles, size every tip, lightly buff, then dehydrate with alcohol.
- Application day: Do the 10-minute press routine at least 2 to 3 hours before putting on sandals.
- Before water: Wait 6 hours after gluing before swimming, overnight is better.
- After water: Pat dry, keep lotions and oils away from the edges that first day.
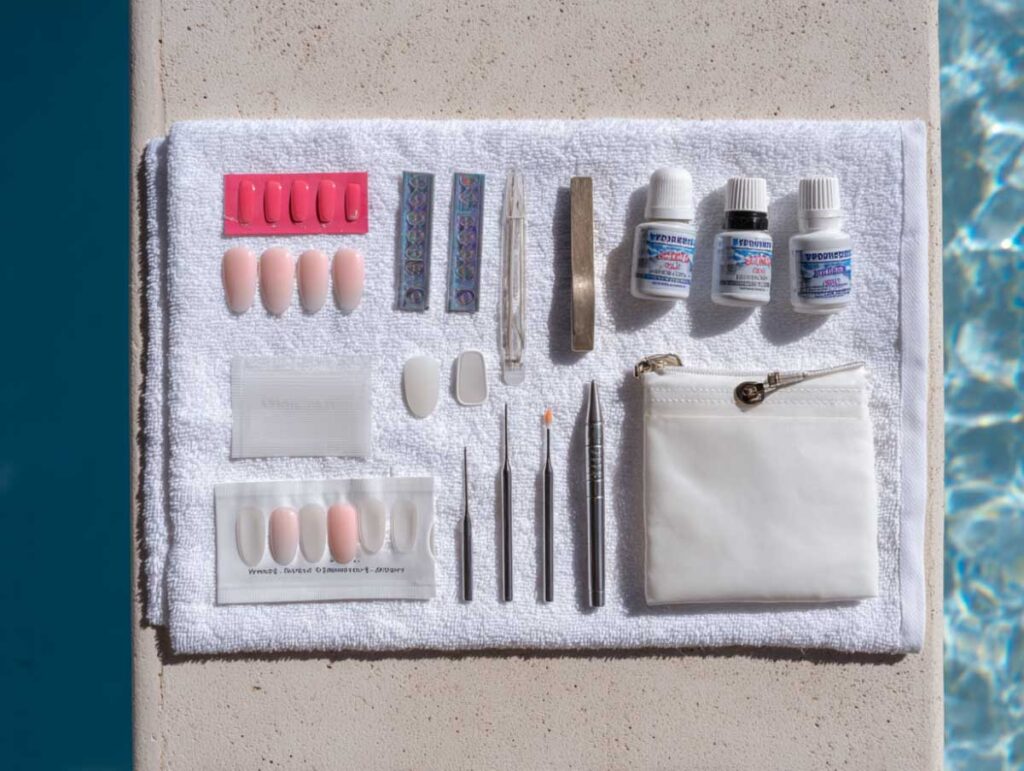
What I keep in my kit
- Press-on pedicure set with multiple sizes
- Nail glue and adhesive tabs
- Dehydrator or alcohol wipes
- Mini buffer and file
- Cuticle pusher
- Toe separators
- Cotton swabs for cleanup
- Clear top coat
- Tiny “save the day” pouch: a spare big-toe nail, a couple of tabs, travel glue, and two wipes
I link to press-on pedi kits, strong-hold glue, dehydrator wipes, and toe separators when I share this checklist, since those are the things I actually use.
Prep that actually matters: dehydrate, size, pre-shape
Prep decides if you get a glossy week or a sad pop-off at brunch.
- Kill the oils: Wash, dry, then wipe each toenail with dehydrator or alcohol. Don’t skip this.
- Push back cuticles: Glue sticks to nail, not skin. A quick push and trim of dead skin helps a lot.
- Lightly buff: Two gentle swipes to remove shine. You’re creating grip, not sanding furniture.
- Size and pre-shape: Match each press-on to each toe before any glue shows up. If a side touches skin, file it now so the nail sits edge to edge, not on skin.
- Dry run: Lay them out in order. Future you will be calmer and faster.
Glue vs adhesive tabs: when to use each
Adhesive tabs
- Great for: a photoshoot, a wedding weekend, a short trip.
- Typical wear: 1 to 3 days with gentle use.
- Pros: fast, low odor, easy removal, kinder to nails.
- Cons: heat and water loosen tabs, not my pick for pool days.
Nail glue
- Great for: sandals, beach, travel, anything active.
- Typical wear: 5 to 10 days if you prepped well and keep edges clean.
- Pros: strongest hold, water resistance after full cure.
- Cons: removal takes patience, so don’t rush it.
My hybrid trick: Tabs plus a tiny dot of glue in the center of the big toes only. It adds hold where sandals flex most, removal stays easier than full glue on every toe.
The 10-minute press routine and cure time
Set a timer. Work one toe at a time.
Minute 0 to 2: Final prep
- Wipe each nail again.
- Toe separators on, because wiggly toes love chaos.
Minute 2 to 6: Apply
- Glue method: a tiny bead on your nail, a whisper-thin smear inside the press-on. You want contact, not a glue flood.
- Tab method: stick tab on the nail, peel the film, then seat the press-on.
- Seat and hold: slide the press-on under your cuticle line, press from center, then clamp the sides. Hold 30 to 40 seconds with real pressure.
- Tidy up: if glue squeezes out, touch it with a dry cotton swab, then gently wipe the skin with alcohol, not the nail.
Minute 6 to 8: Edge seal
- File the tiniest plastic lip off the free edge.
- Optional: a thin clear top coat, cap the tip to slow water creep.
Minute 8 to 10: Hands off
- Keep toes apart, no lotion, no tight straps yet.
Cure time that pays off:
- Slip into slippers and wait 2 to 3 hours before sandals.
- Avoid water for 6 hours, overnight is best. The glue keeps hardening as solvents evaporate.
Sandal fit, straps, and friction points
Straps can be sweet or savage. Here’s how I keep them friendly.
- Strap path check: If a strap crosses the free edge of your big toe, rethink the sandal or adjust the fit. Constant flicking equals lift.
- Secure the heel: A stable heel strap means you grip less with your toes, which keeps the free edge safer.
- Smooth linings help: Rough woven straps can sand tiny corners. I save those for tab days.
- Micro padding: A dot of moleskin or a tiny silicone pad under a hot spot saves a set.
- Keep them short: For sandals, I stop the press-on flush with my natural nail or a hair shorter. Long looks glam, long also gets levered off.
Pool and beach survival tips
- Apply the night before: Every time I try same-day glue and swim, I regret it.
- SPF strategy: Sunscreen on feet is great, but keep it away from edges. I’ve popped a big toe before lunch by slathering SPF over the cuticles. If it happens, wipe edges with alcohol and press again.
- After a swim: Rinse with fresh water, pat dry, press each nail from center to sides for five seconds to re-seat any micro lift.
- Sand watch: If you feel grit at a corner, dry everything, add a pin-head dot of glue, press for 30 seconds, done.
- Carry the micro kit: One spare big toe, a couple of tabs, travel glue, two wipes. It weighs nothing and saves the day.
The break-in check, my quick “pool test”
Do this at home so the pool isn’t your surprise.
- Warm water splash test: After full cure, run warm water over your feet for 10 seconds, dry, check corners.
- Strap walk: Wear your sandals indoors for 15 minutes. If you hear the free edge tapping the footbed, file it shorter.
- Towel snag test: Lightly drag a towel over each toe. If it snags, smooth the edge again.
Pass these and you’re ready for the real thing.
Removal and nail health
Promise me one thing, don’t pry.
- Tabs: Soak in warm soapy water for 10 minutes, slide a wooden pusher from the side, they lift clean.
- Glue:
- Soak 10 to 15 minutes.
- Work cuticle oil along the sides, wiggle gently, re-soak if needed.
- For stubborn spots, wrap a tiny acetone-soaked cotton bit on the nail only for a few minutes, keep it off skin as much as you can.
- Aftercare: Light buff, a little cuticle oil, and if you can, give your nails a one-week breather between sets.
Troubleshooting, real fixes that worked for me
- Corners keep lifting: The nail is too long or the sidewalls are on skin. Pre-file the sides and shorten the free edge.
- Pop-offs after lotion: Oils kill adhesion. Wipe with alcohol, add a tiny dot of glue, press again.
- Tabs melting in heat: Switch to glue for hot days or do the hybrid, tab plus micro dot of glue on the big toes.
- Big toe won’t stay: Double the prep, extra buff and dehydrate, then hold pressure a full 40 seconds.
- Best press-on pedicure shape for sandals: Short square or soft squoval. Almond or coffin is pretty, but straps love to flick the corners.
- How to apply fast before a trip: Size and pre-shape the night before, store each toe in a labeled bag, then apply in ten minutes before you head out.
FAQ
How long do press-on toenails last in sandals?
With glue and solid prep, I usually get about a week. Tabs are more of a long weekend solution.
Can I swim with them on?
Yes, after full cure. I apply the night before and I’m careful with SPF at the edges.
Are press-ons safe for toenails?
With gentle removal and breaks between sets, my nails stay healthy. The damage happens when people rip them off or overbuff.
Quick shopping checklist
- Press-on pedicure kit with multiple sizes
- Precision-tip nail glue
- Adhesive tabs for short wear or backups
- Dehydrator wipes or alcohol wipes
- Toe separators
- Mini buffer and glass file
- Cuticle oil and gentle remover
- Clear top coat for edge sealing
Final take
Press on toenails for sandals absolutely work. Prep well, choose the right adhesive, let them cure, and be smart about straps and sunscreen. Keep a tiny repair kit in your bag, and you’ll have a shiny, durable pedicure without booking a salon seat.
More on Blufashion
- Want smoother, longer-lasting polish under your press-ons? Check our quick guide on how long nail polish takes to dry.
- Curious which 5-free polishes are actually good? Check our picks, 11 brands worth your money.
- Love glossy, long wear pedis? Check out our guide to Korean gel nail polish and the best brands to try.
- About the Author
- Latest Posts

I’m Iskra Banović, editor of Blufashion and the voice behind its fashion, beauty, and lifestyle stories. Fashion, beauty, and lifestyle are my playground, but I’m just as likely to share the messy side of it all, like the time I tested a “must-have” skincare gadget and ended up with glitter stuck in my hair. I love turning trends and everyday finds into something useful (and fun) for real people.


